OpenCV-Python是一个Python库,旨在解决计算机视觉问题。那么,很多的小伙伴都有兴趣了解一下吧,正好,小编给大家总结了关于这方面的一些代码问题,本文将利用Python+OpenCV实现图像识别替换功能,小伙伴们在读完之后,可以自己动手实践一下哦。
OpenCV-Python是一种Python库,目的在于处理机器视觉难题。
OpenCV可以说是开源系统的机器视觉库,1999年于intel的GaryBradski启动。Bradski在访学时候留意到,在大多数优秀大学的实验室中,都会有相当完善的内部公开的机器视觉接口。这类接口从一届学生传至另一届学生,针对初入行的小白而言,利用这些接口比重复造轮子方便很多。这类接口能让他们在之前的基础上更有效地开展工作。OpenCV正是基于为机器视觉提供通用接口这一目标而被策划的。
安装opencv
pip3 install -i https://pypi.doubanio.com/simple/ opencv-python
思路:
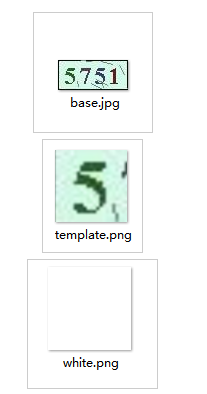
1、首先区分三张图片:
base图片代表初始化图片;
template图片代表需要在大图中匹配的图片;
white图片为需要替换的图片。
2、然后template图片逐像素缩小匹配,设定阈值,匹配度到达阈值的图片,判定为在初始图片中;否则忽略掉。
3、匹配到最大阈值的地方,返回该区域的位置(x,y)
4、然后用white图片resize到相应的大小,填补到目标区域。
match函数:
"""检查模板图片中是否包含目标图片"""
def make_cv2(photo1, photo2):
global x, y, w, h, num_1,flag
starttime = datetime.datetime.now()
#读取base图片
img_rgb = cv2.imread(f'{photo1}')
#读取template图片
template = cv2.imread(f'{photo2}')
h, w = template.shape[:-1]
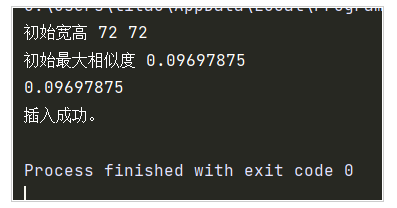
print('初始宽高', h, w)
res = cv2.matchTemplate(img_rgb, template, cv2.TM_CCOEFF_NORMED)
print('初始最大相似度', res.max())
threshold = res.max()
""",相似度小于0.2的,不予考虑;相似度在[0.2-0.75]之间的,逐渐缩小图片"""
print(threshold)
while threshold >= 0.1 and threshold <= 0.83:
if w >= 20 and h >= 20:
w = w - 1
h = h - 1
template = cv2.resize(
template, (w, h), interpolation=cv2.INTER_CUBIC)
res = cv2.matchTemplate(img_rgb, template, cv2.TM_CCOEFF_NORMED)
threshold = res.max()
print('宽度:', w, '高度:', h, '相似度:', threshold)
else:
break
"""达到0.75覆盖之前的图片"""
if threshold > 0.8:
loc = np.where(res >= threshold)
x = int(loc[1])
y = int(loc[0])
print('覆盖图片左上角坐标:', x, y)
for pt in zip(*loc[::-1]):
cv2.rectangle(
img_rgb, pt, (pt[0] + w, pt[1] + h), (255, 144, 51), 1)
num_1 += 1
endtime = datetime.datetime.now()
print("耗时:", endtime - starttime)
overlay_transparent(x, y, photo1, photo3)
else:
flag = Falsereplace函数:
"""将目标图片镶嵌到指定坐标位置"""
def overlay_transparent(x, y, photo1, photo3):
    #覆盖图片的时候上下移动的像素空间
    y += 4
    global w, h, num_2
    background = cv2.imread(f'{photo1}')
    overlay = cv2.imread(f'{photo3}')
    """缩放图片大小"""
    overlay = cv2.resize(overlay, (w, h), interpolation=cv2.INTER_CUBIC)
    background_width = background.shape[1]
    background_height = background.shape[0]
    if x >= background_width or y >= background_height:
        return background
    h, w = overlay.shape[0], overlay.shape[1]
    if x + w > background_width:
        w = background_width - x
        overlay = overlay[:, :w]
    if y + h > background_height:
        h = background_height - y
        overlay = overlay[:h]
    if overlay.shape[2] < 4:
        overlay = np.concatenate([overlay, np.ones((overlay.shape[0], overlay.shape[1], 1), dtype=overlay.dtype) * 255],axis=2,)
    overlay_image = overlay[..., :3]
    mask = overlay[..., 3:] / 255.0
    background[y:y + h,x:x + w] = (1.0 - mask) * background[y:y + h,x:x + w] + mask * overlay_image
    # path = 'result'
    path = ''
    cv2.imwrite(os.path.join(path, f'1.png'), background)
    num_2 += 1
    print('插入成功。')
    init()
每次执行需要初始化x,y(图片匹配初始位置参数),w,h(图片缩放初始宽高)
x = 0
y = 0
w = 0
h = 0
flag = True
threshold = 0
template = ''
num_1 = 0
num_2 = 0
photo3 = ''
"""参数初始化"""
def init():
    global x, y, w, h, threshold, template,flag
    x = 0
    y = 0
    w = 0
    h = 0
    threshold = 0
    template = ''
完整代码
import cv2
import datetime
import os
import numpy as np
x = 0
y = 0
w = 0
h = 0
flag = True
threshold = 0
template = ''
num_1 = 0
num_2 = 0
photo3 = ''
"""参数初始化"""
def init():
    global x, y, w, h, threshold, template,flag
    x = 0
    y = 0
    w = 0
    h = 0
    threshold = 0
    template = ''

"""检查模板图片中是否包含目标图片"""
def make_cv2(photo1, photo2):
    global x, y, w, h, num_1,flag
    starttime = datetime.datetime.now()
    img_rgb = cv2.imread(f'{photo1}')
    template = cv2.imread(f'{photo2}')
    h, w = template.shape[:-1]
    print('初始宽高', h, w)
    res = cv2.matchTemplate(img_rgb, template, cv2.TM_CCOEFF_NORMED)
    print('初始最大相似度', res.max())
    threshold = res.max()
    """,相似度小于0.2的,不予考虑;相似度在[0.2-0.75]之间的,逐渐缩小图片"""
    print(threshold)
    while threshold >= 0.1 and threshold <= 0.83:
        if w >= 20 and h >= 20:
            w = w - 1
            h = h - 1
            template = cv2.resize(
                template, (w, h), interpolation=cv2.INTER_CUBIC)
            res = cv2.matchTemplate(img_rgb, template, cv2.TM_CCOEFF_NORMED)
            threshold = res.max()
            print('宽度:', w, '高度:', h, '相似度:', threshold)
        else:
            break
    """达到0.75覆盖之前的图片"""
    if threshold > 0.8:
        loc = np.where(res >= threshold)
        x = int(loc[1])
        y = int(loc[0])
        print('覆盖图片左上角坐标:', x, y)
        for pt in zip(*loc[::-1]):
            cv2.rectangle(
                img_rgb, pt, (pt[0] + w, pt[1] + h), (255, 144, 51), 1)
        num_1 += 1
        endtime = datetime.datetime.now()
        print("耗时:", endtime - starttime)
        overlay_transparent(x, y, photo1, photo3)
    else:
        flag = False


"""将目标图片镶嵌到指定坐标位置"""
def overlay_transparent(x, y, photo1, photo3):
    y += 0
    global w, h, num_2
    background = cv2.imread(f'{photo1}')
    overlay = cv2.imread(f'{photo3}')
    """缩放图片大小"""
    overlay = cv2.resize(overlay, (w, h), interpolation=cv2.INTER_CUBIC)
    background_width = background.shape[1]
    background_height = background.shape[0]
    if x >= background_width or y >= background_height:
        return background
    h, w = overlay.shape[0], overlay.shape[1]
    if x + w > background_width:
        w = background_width - x
        overlay = overlay[:, :w]
    if y + h > background_height:
        h = background_height - y
        overlay = overlay[:h]
    if overlay.shape[2] < 4:
        overlay = np.concatenate([overlay, np.ones((overlay.shape[0], overlay.shape[1], 1), dtype=overlay.dtype) * 255],axis=2,)
    overlay_image = overlay[..., :3]
    mask = overlay[..., 3:] / 255.0
    background[y:y + h,x:x + w] = (1.0 - mask) * background[y:y + h,x:x + w] + mask * overlay_image
    # path = 'result'
    path = ''
    cv2.imwrite(os.path.join(path, f'1.png'), background)
    num_2 += 1
    print('插入成功。')
    init()


if __name__ == "__main__":
    photo1 = "1.png"
    photo2 = "3.png"
    photo3 = "white.png"

    while flag == True:
        make_cv2(photo1, photo2)
        overlay_transparent(x, y, photo1, photo3)
执行结果:
到此这篇关于Python+OpenCV实现图像识别替换功能详解的文章就介绍到这了,希望可以给大家带来帮助。
文章版权归作者所有,未经允许请勿转载,若此文章存在违规行为,您可以联系管理员删除。
转载请注明本文地址:https://www.ucloud.cn/yun/127547.html
摘要:时间永远都过得那么快,一晃从年注册,到现在已经过去了年那些被我藏在收藏夹吃灰的文章,已经太多了,是时候把他们整理一下了。那是因为收藏夹太乱,橡皮擦给设置私密了,不收拾不好看呀。 ...
摘要:美国开国领袖们如果看到美国民众只能在希拉里和川普中选择,估计要集体气活过来。本教程由发布在实验楼,完整教程及在线练习地址川普撞脸希拉里基于的面部特征交换一教程介绍内容简介通过库来实现人脸面部特征交换。 话说这次美国大选可谓赚足了眼球,在美国史上,恐怕没有哪一年的总统大选会像今年一样诡谲和热闹。 美国开国领袖们如果看到美国民众只能在希拉里和川普中选择,估计要集体气活过来。作为一个闲得蛋疼...
摘要:的文本检测器是一种基于新颖架构和训练模式的深度学习模型。深度学习文本检测器图文本检测全卷积网络的结构等人的图。随着和的发布,我们现在可以使用一种名为的基于深度学习的文本检测器,它基于等人的年论文一种高效精确的场景文本检测器。 by Adrian Rosebrock on August 20, 2018 in Deep Learning, Optical Character Recogn...
摘要:了解华为海思的方案海思的前身是华为的半导体部门,主要产品线包括智能手机处理器麒麟系列,视频采集和编解码处理器系列,无线通信方向芯片等。 目录 一、视频行业1、视频...
阅读 1170·2023-01-14 11:38
阅读 1162·2023-01-14 11:04
阅读 991·2023-01-14 10:48
阅读 2544·2023-01-14 10:34
阅读 1249·2023-01-14 10:24
阅读 1131·2023-01-14 10:18
阅读 738·2023-01-14 10:09
阅读 822·2023-01-14 10:02